Monday, June 6, 2011

Ice Cream Sandwich Dessert

This is kind of a last minute, after thought of a post. We had the missionaries over for dinner tonight, (they are a couple of young men from another part of the country who came out here to help teach people about our church) and I made this super easy, yet seemingly impressive dessert. I was half way through putting it together when I thought about posting it. So the pictures start in the middle, but don't worry, it is way easy!!!! My 5 year old put it together for me!


The ingredients I used were Vanilla Ice Cream Sandwiches
                                           Cool Whip
                                           Hot Fudge topping
                                           Caramel topping

This is where I decided to take picture so I can blog about it. The first layer is done here and we are about to start on the second layer. Oh, and pay no attention to the clutter in the background! OOPS!
Adding the second layer. My son decided he needed to be in the pictures too, even though it was Danica who put the dessert together. :-)


All you need to do is put it all together in layers. I used a 9x13 glass dish, but you could use any size you want. As long as it is square or rectangle.

First - Put down a layer of ice cream sandwiches. Fill in as much of the pan as you can, even if you have to cut the sandwiches to fill in any small spaces. My pan fit 91/2 sandwiches.
Second - Spread a layer of cool whip over the sandwiches. This can be as thick or as thin as you like, but we like a thick layer of the stuff!!!
Third - Drizzle the caramel and hot fudge toppings over the cool whip. Again, as much or as little as you like. This is also a good spot to add whatever other "ice cream sundae" type toppings you like. I have done fresh strawberries (YUM) or crushed Heath bars (OHHHH). You could do chopped peanuts, or Maraschino Cherries, or heck, why not a drained can of crushed pineapple and sliced bananas? Anything really.
Fourth - Start the process all over again! Layer the sandwiches, then cool whip, then toppings! 
Last - Freeze the dessert for at least 3 to 4 hours before serving to let the ice cream re-harden. (Tip: Keep the sandwiches for the second layer in the freezer until you are ready to use them. They melt fast and can become very messy!)

Adding the second layer of Cool Whip.

Finished product! I usually do a pretty design with the drizzled toppings, but my 5 year old had fun doing her own design this time!

Notice the different layers? People will be impressed and wonder how you made cake layers so thin! at least, that has been my experience! Good Eats!

Thursday, June 2, 2011

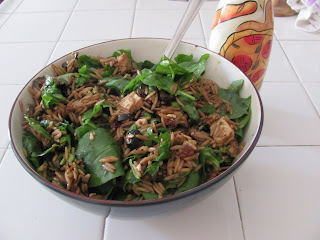
Orzo Salad

      I wanted to post this a few days ago, but I am still getting used to finding time to blog. My family (mostly my husband) is trying to get used to me wanting the computer more often. :-)  They are not sure what to do with the fact that mom is now trying to be a computer person! Ha-Ha!
      Anyway, I had a wonderful Memorial Day. We headed over to my brother-in-law's house where we enjoyed swimming, B-B-Q, family, friends, and a lot of sun! My job was to bring a salad of some sort, and my hubby asked for it to be potato salad. I love potato salad, but I have just been told that I have gestational diabetes, so I can't have much of it. I also have to be careful with b-b-q sauce, so I know there wasn't going to be a lot of stuff there that I could eat. So how was I going to navigate through Memorial day with out having a huge sugar spike? I needed to bring something that I liked just as well as all the other food, but that I could eat with no problem. What could that be? I know, Orzo salad! My husband does not like it very much, but I love it. And because it went so fast on Memorial Day, I thought I would share it with you. (Oh, and yes, I made potato salad too.)

So here are the ingredients:


I seasoned this with onion powder, garlic salt, and dried parsley.


You will need :

                    2 cups uncooked Orzo (found in the past isle - it is a small pasta that looks like rice)
                    fresh spinach
                    crumbled feta cheese
                    olives - sliced or whole depending on your preference
                    sun dried tomatoes packed in oil - drained and chopped
                    1/2 cup balsamic vinegar
                    1/2 cup olive oil
                    pine nuts (not pictured, and optional, but really good!)
                    1 large grilled chicken breast, cubed (optional)

What to do:

                  First you need to cook the orzo according to package directions. This will not take long as it is a  small pasta. Once it is done, drain and rinse under cold water. Normally I would not rinse my pasta, but in this case, the cold water stops the cooking right away, and washes off some of the starch so the little pasta pieces don't stick together. Let it drain well, so it gets nice and dry, then put the orzo in a medium mixing bowl. Add all the other ingredients, except the spinach and toss.(The amount of feta, olives, tomatoes, and pine nuts is up to you. I like a lot of stuff in my salads, so I add quite a bit.) Then add the balsamic vinegar, and the olive oil, and toss. It will seem like a lot, but don't worry, it works out. Then add as much spinach as you like and toss it again to coat it with the dressing. Cover the bowl tightly and refrigerate for a few hours, or over night. Then... Enjoy!!!!

Yummy!

Saturday, May 28, 2011

Spiffy Scissors

My kids are on a year round schedule in school. Because of that, my daughter just finished kindergarten yesterday. I wanted to make a small thank you gift for her teacher that wouldn't put a hole in my pocket. I started browsing my favorite blogs and I came across the tutorial of "Spiffy Scissors" over at Crap I've Made by Char. I wanted to link her tutorial, but yet again, my lack of computer skills tells me "You do not know what you are doing!!!" So, that is what I need to work on. I would however, like to give you her information so you can go check out her blog/tutorial and learn how to make them. It is at crapivemade.com  ; entitled "Spiffy Scissors" ; posted on April 26,2011  ; and filed under uncategorized.  Her blog is great, and full of wonderful ideas.

Here is how my spiffy scissors turned out.


In her post, she used a product by Mod Podge called Dimensional Magic. It is a product that gives a dimensional glassy finish to your crafts. It dries hard and clear. I could not find it anywhere! I looked at multiple Michael's stores, and JoAnne craft stores. I even called ones a little further away from me. Not only did they not have it, but they had never heard of it! So frustrating. I looked it up online and found it, but it was going to cost me more to ship it to me than to buy it. So, that was a no go. Luckily, I found a product that is as close to it as I can imagine. It is called Aleen's Paper Glaze. Michael's carried it, but again, it wasn't familiar to the employees. I had to find the right person who was actually willing to look for me.


I don't think  it is as  puffy as the Mod Podge Demensional Magic, but you can layer it to give it more of a raised look. I choose only one layer. It also dries to a clear, hard, glassy finish. I thought it looked great.
Other than that, I did everything exactly according to Char's tutorial. go check it out!  http://www.crapivemade.com/2011/04

Hey! Look at that.... I just figured out how to post a link. I hope it works! LOL! Hope it is the right one. (fingers are crossed)


Here are a few more pictures of my "Spiffy Scissors"


Monday, May 23, 2011

Meet The Family


If you read my first post, I mention how I am not computer savvy. I meant it! One of the things I know I need to learn is how to get pictures from my camera to the computer and then from the computer onto my blog. So this post is practice for me.

From left to right: Tyler, Becky, Jessica, Dan, Danica


This is my little family. (Please note that I am 27 weeks pregnant. That is why I look so fat swollen.) My husband and I will be celebrating our 15th wedding anniversary in a few months. As you can see we have three beautiful children, and number four is on her way. Our son is Tyler, and he just turned 13. Yep! I now officially have a teenager, and already it is like walking a tightrope in the dark! He is a GREAT kid, but I wish they handed you a "Do's and Dont's Of Raising A Teen" book. LOL! He is an excellent student in school, and is on his way to becoming an Eagle Scout. He makes me very  proud. Next we have our daughter Danica. (No, she is not named after the racecar driver. Can you tell I get that a lot?) She will be 6 soon, and is about to finish kindergarten. She loves reading, and dancing. Next is our little Jessica. She will be 4 next month, but she can't wait until she is 5 because then she gets to go to school like her big brother and sister. She is our more reserved child, but secretly she wants to be the "star". These two girls keep their father and I laughing all the time!  We don't have a name picked out for our baby yet, but we do know that it will be a girl. (Poor Tyler.)  We are all excited about meeting her soon. My husband is Dan, and he is just about the easiest guy to get along with that you will ever meet. He is a big Lakers fan, and his favorite band is Oingo Boingo. (If any one knows who they are, KUDOS to you!!! YAY!) It does not seem like it has already been 15 years of marriage with him. I guess it is true, time flies when you are having fun. And I have a lot of fun being with him.
And of course, my name is Becky, and I LOVE being a mom. I also enjoy cake decorating, and crafting. I hope to get better at both.
So that is my family in a nutshell. I hope my post wasn't too boring to read. I do have a crafting post coming soon. I am making a thank you gift for Danica's teacher. I am crossing my fingers that it comes out the way I hope. Either way, it will be posted. ;-) Hope to see you back here soon!

Saturday, May 21, 2011

My New Blog!

First, I would like to say "HI" and "WELCOME!" to my very own, and very new blog!!!! YAY! I would also like to add.... "what am I doing?". I am not the most savvy computer person. (That is an understatement by the way.) But I love to look at blogs, and always wondered if I could start one of my own. So today, I decided to find out if I could do it. I intend this blog to be a place where I can share my experiences and crafting endeavors, good and bad, creative, and not so creative. I figure I can learn what I am doing by just diving in and getting my feet wet. I hope I can figure things out as I go. So an apology upfront is warranted, I think. I KNOW I will make many mistakes.....and I am sorry. But I hope this will be an enjoyable experience not only for me, but for all those who may happen upon this blog.